
And folds into this ...

**UPDATE : You can now download this tutorial as a PDF.
You’ll need the following:
• Some sturdy fabric - I used half a metre of 55" (142cm) wide home-decorating weight fabric.
• Some poppers (you’ll need one female half of the popper and two male halves of the popper) – I used sew-in ones but you can use no-sew ones and set them with a popper setting tool
• A fancy button or you can make a yoyo or a small fabric flower (optional)
• 92 inches (234 cm) in total of bias-binding (I used a double-fold one which is 3/4(three quarter) inch (20mm). When folded around my project, it’s 3/8(three eighth) of an inch or 10mm – NOTE: If you want to bias-bind the inside bottom seam of your bag, you will have to allow for an extra 10 inches.
You’ll also need some tracing paper or greaseproof paper to draft out your pattern. I will try to get a pdf of the actual pattern done sometime soon but it is pretty easy to draft.
P.S. I apologise if you’re not used to working in inches. I am a bit of an old-school girl and usually only work in inches.
Here’s the flap. See drawing below. You’ll need to draw a rectangle measuring 6.25 inches by 5 inches. At the bottom of the rectangle on one side, mark a point 2 inches in from the side and mark another point 2 inches up from the bottom. Repeat for the other corner of the rectangle. Then using a curved object like a jar lid or egg cup, draw a curve from one point to the other. You’ll end up with a pattern like the one drawn in pink. This pattern includes a 3/8 (three eighth) inch (1cm) seam allowance.

OK, here is the body of the bag. See drawing below. Draw a rectangle measuring 24 inches by 10 inches. Draw a line across the rectangle 8 inches down the long side. Let’s concentrate on the smaller rectangle section now and draw our bag handle. Along the 10 inch sides, make a mark 4 inches in and a second mark 3 inches after that. Join the marks so your smaller rectangle is split into 3 even smaller rectangles. The 3 inch section in the middle is your bag handle. Make little marks 2 inches from the bottom of your handle section on both sides. Make two other little marks 2 inches away from the handle section along the 10 inch line. Join the marks on each side using your jar lid or egg cup. You should now have a pattern which looks like the one marked below in green. Referring to the drawing below, mark the side which should be placed along the fold of your fabric. This pattern includes a 1/2 (half) inch seam allowance (1.27cm).

Using the bag body pattern which you drafted, place it on the fold of your fabric and pin in place. Cut out your fabric. Repeat this process again so you end up with 2 body pieces. Save the U shaped piece you cut out at the top where the handle is. You can cut the flaps out of these U shaped offcuts.

Placing your pieces right side together, pin the sides of the bag.

Sew along the sides of your bag like this using a 1/2 (half) inch seam allowance.

As this is a single layer bag, I want to keep the raw edges tidy. So I pinked the edges with my pinking shears and then pressed the seams open.

Making the flap – cut 2 flap pieces from your chosen fabric using the flap pattern. If you had saved the U shaped pieces left over from when you cut your body pieces earlier, you will find the flap pattern fits in there very nicely.
Place them right sides facing, match the edges together and pin in place.

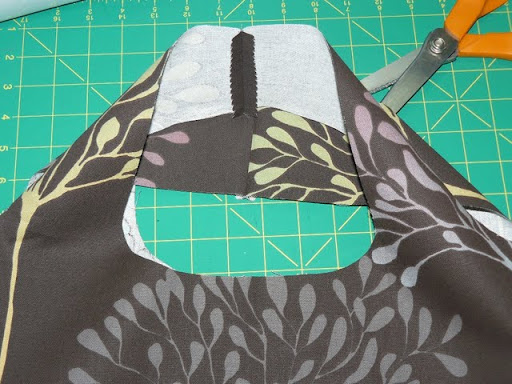
Sew using a 3/8 (three eighth) inch (1 cm) seam allowance leaving a 2 inch gap along the straight side for turning. Cut the corners off carefully and clip around the curve – ie make small snips in the fabric carefully where the curve is but do not cut through your stitching line.

Turn the flap right side out using the gap you left along the straight edge. Gently poke the corners out with a pencil and using something like a butter knife, gently poke around the curve. Press the flap, top-stitch around the curved edge (see below) and set aside.

Now to form the bottom of the bag. Fold the bottom of the bag so that the side seam sits 2 inches in from the edge like this. Make sure all the edges line up at the bottom. Pin in place and do the same for the other side.

Sew straight across the bottom – see photo below. I actually sewed across this seam twice for strength.

You now have a choice of how you want to finish this raw edge. You can either pink the edge or you can encase the seam in bias-binding.

When you turn your bag out the right way, the bottom of your bag will look like this.

Next you have to sew the handle ends together. Place the handle ends on each side right side together and stitch across. Pink the raw edges and press the seams open. You’ll now have one big opening for your bag and two loops for your handles.
Now comes the binding! You may have come across this tutorial before – but if you have not, have a look at Amy Carol aka Angry Chicken’s video tutorial.
I tend to sew my bias binding on without pinning it first. I learnt how to sew bias binding using this terrific video tutorial made by Angry Chicken. Go check out that video first if you haven’t seen it before. Then come back here for the end of my tutorial.
Turn your bag so the wrong side is facing out. You’ll need to cut 3 pieces of bias-binding – cut 2 pieces which are 25 inches long and 1 piece which is 42 inches long.
Take one of the shorter pieces. Open up your bias tape and fold down the end by about 1/4 (quarter) inch. Place it along the edge of one of the handle loops with the bias-binding edge right on top of the edge of your fabric. I started sewing my bias-binding right by the seam at the top of the handle. Start sewing at your fold.

Sew right the way around until you get to your starting point. Overlap your bias-binding on top of your starting point and stitch on further by about 1/2 (half) inch or 1 cm. Cut off any excess bias-binding.

Flip the bag right side out. Fold the bias-binding over the edge and stitch it down.

Repeat this process for the other handle loop and the long edge around the opening of the bag. Use the 42 inch piece of bias-binding for the opening of the bag. You should end up with this.

On one side of your bag, draw a chalk line 1.25 inch (approx 3 cm) from the bottom edge of your handle loop. Mark the middle the the bag along that line too. Along the middle of the bag, make a chalk mark 4.5 inches below your chalk line. See the blue chalk marks in the pic below.

Place your flap on the line so the middle of your flap lines up with the middle of your bag. Pin in place.

Sew your flap to the bag. I used two rows of stitching.

On the opposite side, make a chalk mark in the middle of your bag about 1 inch from the bottom edge of your handle loop.

Sew one of the male half of your poppers to this mark.

To provide a little added strength to this closure point, I cut a small circle of fabric and placed it behind the point where I was sewing the popper and sewed through both layers.

I sewed the female half of my popper to the underside of the flap.

I sewed the other male half of the popper to the mark which I made 4.5 inches below the joining line of the flap, again using a small circle of fabric as reinforcement. You can also see the decorative button I sewed to the top of the flap in this photo.

That’s it! You’re done! To fold your bag, first fold the handles down like this –

Then fold one side of the bag towards the middle like this ...

Then fold the other side of the bag into the middle like this ...

Fold this rectangle in half and roll the bag up towards the flap.

Press the popper close and you have your cute little pouch which will fold out into a shopping bag.
Thanks for staying with me to the end of this tutorial. I hope you find it helpful when sewing your own foldaway shopping bag. Let me know how you get on and do post photos of your foldaway shopping bags on the CraftyAdy Flickr group. Email me or leave a message if any part is not clear.
Happy sewing!
Gorgeous fabric, as ever!
ReplyDeleteI also like fabric shopping bags - mainly because they can be thrown in the washing machine regularly so that you know they're clean! This looks lovely and very practical.
Very cool!! I have one (very simple square one)I made, fold it, secure it with a hair tie(!) hahah! One fine day I will attempt something like this :) btw, I like your nails, did you do them yourself?
ReplyDeleteJess
Your tutorial looks fantastic! I hope to get started before the craziness of making Halloween costumes starts up later this month.
ReplyDeleteThis is so cute and perfectly practical. I love the fabric!
ReplyDeletesuper clever!!! I want to make one RIGHT now!
ReplyDeletethank you for this excellent tutorial! Very good idea!Eva
ReplyDeleteOh, this is wonderful, thank you! The bias binding scares me a little, but as it's something I've been meaning to try for ages, I'll give it a go. Such clear pictures and great instructions - I know what everyone's getting for Christmas this year!
ReplyDeleteThanks :)
I've been wanting to make some of these as gifts so I might give this a go. I'm a novice sewist so this looks a little complicated, hopefully it'll be easier when I try! Thanks!
ReplyDeleteOh,wow.Many thanks for your great tutorial.I will try this wonderfull fold-away shopping bag too.
ReplyDeleteIt looks very good!!!
lovely greetings
tinka
Wonderful, loved it, congratulations
ReplyDeleteKisses
Margaret
Lovely bag and great tutorial, thanks for sharing.
ReplyDeleteVERY CUTE! I love the bag I have that just folds up and stays in my purse always. I'll have to try and make your version too.
ReplyDeleteI love this pattern, and the material you used..but i really, really hate sewing..do you sell these ready-made?
ReplyDeletesomehow, i just can't get enough of clever shopping bags, or clever DIY projects...this is both!!!! thanks for sharing.
ReplyDeleteThanks for this great tutorial! I read about it on TipNut.com where I've always found lots of neat ideas and patterns. Will give this pattern a try very soon.
ReplyDeleteKaren
That is the best design I've ever seen and a darn good tutorial to top it off! Thank you!
ReplyDeleteI think the bag is cute but just looking at the instructions I thought it was hard to see because of the black material. I'm just a beginner and I need all the help I can get. But I'll try. Thanks
ReplyDeleteJust fantastic tutorial, which I will bookmark for later use. Your photos tell the entire story. Looks like a great Christmas gift project for sure
ReplyDeleteWow, this looks like an amazing project! Lots of pics (I'm visual so that will help when I get the courage to try it) and great descriptions.
ReplyDeleteI'm curious how you got started learning how to sew. I've always wanted to but have been too chicken. Do you have any suggestions?
Thanks for sharing!
Very cool!! I have one (very simple square one)I made, fold it, secure it with a hair tie(!) hahah! One fine day I will attempt something like this :) btw, I like your nails, did you do them yourself?
ReplyDeleteDuvet Covers | Nerf Guns | BCBG Dresses | Kathy Van Zeeland Handbags | Ginny Doll
Love it! Thank you! I hope you don't mind if I link to it.
ReplyDeleteThanks all for your kind comments.
ReplyDeleteChirstine, you're welcome to link to it. Thanks!
LOVE this!! I have three kids and space is always an issue, so I am constantly on the prowl for things that can be compacted. Now if only I can find the time to make a whole collection of them! Thank you so much! ~Shannon
ReplyDeleteThank you for posting this tutorial. I keep several fold up bags in my purse at all times. I've received some as gifts (purchased ones) and purchased some myself. The price varies, but they don't come cheap. I've been trying to develop a pattern of my own for these, but don't have to now that I've found yours. I have a ton of fabric scraps that would do perfectly for these bags. Thanks you again! Cindy O.
ReplyDeleteThanks for visiting my blog, Shannon and Cindy. I hope your bags turn out well.
ReplyDeleteI recently made two more of these bags and added a little fabric loop so you can hang the folded pouch off your wrist - helpful if like me, you need both hands free to hold on to the kids.
Great tutorial! We've featured it. :)
ReplyDeletehttp://www.significantlysimple.com/2011/02/reusable-shopping-bag.html
(I also emailed you, just in case) :)
Ady, your instructions are clear and concise. I was able to make the bag in a day and it turned out really nice.
ReplyDeleteThanks for sharing!
Jane
You really are a geniuses with these fold up ideas!! And they all looks so darn cute!
ReplyDeleteI just made two for last-minute teacher gifts and they turned out great! THANKS so much!
ReplyDeletethanks you for sharing this! I'd love to try and make one (or more)
ReplyDeleteThis comment has been removed by a blog administrator.
ReplyDeleteI've gone out looking for my own bag fabric, but this one is stuck in my head and nothing else seems to measure up to it. Do you remember what fabric you used?
ReplyDeleteBeautiful. I used a cloth shower curtain from clearance and made four bags with it. Thanks for sharing!
ReplyDeleteThis is great to find! I have linked to it in my blog - http://alittlebirdmademe.wordpress.com/2013/07/12/friday-finds-a-list-of-18-links-to-free-patterns-to-make-market-bags/
ReplyDeleteThanks for the brilliant tutorial. The small purse looks more beautiful then the bag, but both are admirable.
ReplyDeleteHello! I add a link to this page.Take a look here: http://donneinpink.blogspot.it/2014/04/tutorial-e-cartamodelli-borse-borse.html I hope you appreciate this! Maddalena.
ReplyDeleteThank you so much Birila. Really appreciate it.
DeleteWhether I make this bag or not, it is way cool, and you did a great tutorial. Thanks for sharing!
ReplyDeleteEilleen from France
ReplyDeleteThank you for the tutorial.
Hey, thanks for this tutorial. I found it really helpful and linked to it in my post! (I made a similar bag with a different storage method.) Btw, everyone else, these posts take FOREVER, so big props to Crafty Ady. I was all, "Oh, I'll just make a blog and share my pattern in case someone wants to use it." It legit took me all day for three days to make the pattern and post. SO THANK YOU for taking the time to post this - the info was invaluable. I know how much effort it takes! https://swatchbobbin.wordpress.com/2016/03/03/market-bag-with-stuff-sack-free-pattern/
ReplyDeleteThanks Ann!
DeleteThank you all so much for your comments. I am so glad that folks are still finding this tutorial and finding it helpful.
ReplyDeleteThanks so much for this! I had some nice colourful fabric left over from a roller blind project and it was perfect for this! I used a button and a hairband, which I stitched to the opposite side of the flap (where you sew it to the bag itself) so once rolled up, the hairband just stretches around the bag and the button to secure it! Love my new bag!
ReplyDeletewonderful idea. very clearly explained. many thanks.I altered the size to be a bit smaller.Also added a small pouch inside to keep mobile/purse /shopping list. With your explanation it can never go wrong. perfect.
DeleteBrilliant idea and wonderful directions. Thank you.
ReplyDelete