Thursday 29 July 2010

A green green slice of home

Did I ever tell you that I am Malaysian by birth?

I lived in Malaysia for the first 16 years of my life. (My family still live there …. mum, dad, brothers, sisters-in-law, nephews, niece, uncles, aunts and cousins. I miss them a lot.) I then spent the latter part of my teenage years at boarding school in southern England - it was nothing like Enid Blyton's St Clare's or Malory Towers and most certainly nothing like Harry Potter's Hogwarts. After boarding school, I went to a city centre university in the heart of England and after university, I stayed on in the UK, got a job, got married, had kids etc. Travelling back to Malaysia is an expensive affair and doesn’t happen very often. Now and then, I get really homesick – I miss the family and I also miss the food.

Malaysian food is pretty varied, reflecting the wonderful mix of cultures in the country. One of the best things for me about Malaysian food is its fantastic collection of kueh (kuih or kway).

Wikipedia says this about Kueh:

“Kuih are bite-sized snack or dessert foods in the Malay Archipelago. Kuih is a fairly broad term which may include items that would be called cakes, cookies, pudding, biscuit, or pastries in English. Kuih (plural kueh-mueh or kuih-muih in Malay) are more often steamed than baked, and thus very different in texture, flavour and appearance from Western cakes or puff pastries. They are mostly sweet, but some kuih are savoury.”

Living so far away from Malaysia has meant that if I did yearn for good old Malaysian food, I had to make it myself. Today when I got home from work and whilst fixing the kids their dinner, I had a sudden urge to make Kueh Bakar, a baked kueh flavoured like most kuehs, with coconut cream and pandan (screwpine) extract. Like many other kuehs, Kueh Bakar has a distinctive soft, almost pudding-like, yet firm texture. Traditionally it is baked in a heavy flower shaped pan – I didn’t have one so I poured the mixture into my frying pan, scattered the toasted sesame seeds on top and stuck it into the oven!


I used this recipe from Lily’s Wai Sek Hong blog and it turned out pretty good. The pandan extract I have is pretty strong and very green (my mum brought it over from Malaysia for me on one of her previous visits) – hence the intense green colour of my kueh.

Dinoboy has christened this “Shrek cake” on account of its ogre-like hue of green.


The aroma of pandan wafting from the oven instantly transported me back to my childhood days in Malaysia. It’s a sweet, fragrant, creamy and oh-so-green slice of home on a plate.

Bliss.

My creative space …

…. Still has an unfinished zip-away tote on it. Since you’ve probably seen it in a previous post, I thought I’d share something else with you. Here is another in-progress loomed hat for the Operation Christmas Child 2010 campaign …


I’m trying to make one hat every week, looming a few rows here and there when I get a chance in the evenings. The Operation Christmas Child collection is supposed to be scheduled for the second or third week in November this year. I reckon I’ll make my pledged target of 24 hats by then.

If you are unfamiliar with Operation Christmas Child (OCC), check out this link for more information: http://www.samaritanspurse.org/index.php/OCC/index/

I’ve been using unwanted wool given to me by colleagues to make these hats. Sometimes the wool isn’t quite chunky enough, so I have to work with two strands of wool. Make the hats more interesting, don’t you think?

Take a look at other creative spaces linked here at Kootoyou.

Have a creative day, friends.

Monday 26 July 2010

Dumb dots and Apple flowers

I am still making these dinky zipaway totes. I have one more to make (the one with Amy Butler fabrics) and then will have to start on another project. This one is made with one of Michael Miller's Dumb dots fabric and Timeless Treasures' flowers in brown from the Apple range. I really like this polka dot fabric. I used a plain black cotton for the handles.


View from the bottom ....


And finally, all zipped up and ready to go ... I love this fabric - sweet, huh? I only had a fat quarter of this. Must go hunt for a bit more for my stash.


Have a great week, friends.

Sunday 25 July 2010

Lovely combinations

Finding fabrics that look nice together - whether it's for a bag or a dress - is the most fun part of a project for me.

Here are my two latest zipaway totes. These are made with quilting cotton fabric. I'm almost done making this one which is a pairing of one of Michael Miller''s Dumb Dots with the flowers on brown from Timeless Treasures' Apple range .....


And will work on this one next which is a combination of two different Amy Butler prints.


Oooo - let me share one newly acquired bit of fabric for my stash with you. This is a Globaltex (previously called Clarks & Clarks) cotton duck home furnishing fabric called 'Scotties'. I found some on EBay.


How cute is that?!! I need to hunt through the rest of my stash to find the perfect partner fabric for this - I have no idea what I am going to make with this yet.

I hope your weekend is going fine wherever you are, friends.

Friday 23 July 2010

Every bag begins with …

“The letter B, mummy!” chimes my ever-helpful 8-year old reading over my shoulder. No dear – thank you for your input, but no.

I was referring to fabric.

In one of my recent posts, a reader named Megan asked a very pertinent question:
“What type of fabric do you use? I am so clueless when it comes to what is what but I have a really nice sewing machine and am trying to learn. I made a few cute (and simple!) aprons and am about to attempt curtains, but don't know about the correct type of fabric. Do you ever discuss fabrics?”

Great idea, Megan! I thought today I’d share a few things about fabrics with you. When I started making bags and looking into the numerous tutorials in the vast blogosphere, I soon came to realise that almost any kind of fabric can be used to make bags – ok, maybe not the very thin super floppy stuff . But pretty much everything else.

I mostly use quilting cotton – oh how I LOVE quilting cotton! There are a gazillion prints and colours out there. I live near a quilting shop and it’s like walking into a candy store every time I go in there. I have to stop myself from drooling. The colours, the prints and patterns .... *sigh* Quilting cotton is all over the internet – you can find it on Ebay, Etsy and tons of online fabric stores. There is soooo much choice.

Here’s one of my bags made from quilting cotton.


And here is a purse made from quilting cotton.


You can also use linen and sturdier dressmaking fabrics like wool too. This next bag is a combination of decorator weight linen and quilting cotton.


I use decorator weight fabric a lot too – this is the heavier stuff for making curtains, cushion covers and upholstery with. You can get a pretty neat range of home decorator weight fabric these days. There are a few curtain shops in our neighbourhood and they sometimes put out baskets of remnants outside the shop at really marked down prices. This basket bag was made from curtain fabric.


As was this bag.


And this one too.


I’ve never made any bags with dupoin silk – but I have seen some fabulous clutch bags made from dupion silk.

I’ve also recycled tablecloths, bedsheets and old clothing into bags. And somewhere in my stash is a fabulous IKEA fabric shower curtain waiting to be turned into several bags!

If I’m making a bag, I normally prefer to line it so you have an outer shell and an inner layer too. And in between the two layers, there is yet another layer (or more). This kind of reminds me of a Saint Augustine quote which says:
“Do you wish to be great? Then begin by being. Do you desire to construct a vast and lofty fabric? Think first about the foundations of humility. The higher your structure is to be, the deeper must be its foundation.”

A bag’s shape is defined by its foundation layers – the interfacing and if you prefer, wadding / batting too. I think the more shaped a bag, the more you have to think about using interfacing to ensure that your finished bag holds it’s shape.

Lisa Lam of U-Handbag did an absolutely terrific series for newbie bagmakers on her blog.

Part one was all about sewing terminology

Part two was all about fabric and interfacing

She’s also done a guide to interfacings and stabilisers here

Part three is about needles.

Do check out Part 2 and the guide to interfacings if you're keen to read more about fabrics. I am sure you’ll find them as useful as I did. I thought Part 3 about needles was terrific too.

I hope this helps a little with your search for information on fabrics for bag-making, Megan. You will probably find, like most of us who sew, fabric is hugely addictive! I think half the fun of making a bag is picking the fabric for it.

How about you, my other readers? What fabrics do you use or have you used to make bags from? If you have time, do leave a comment about your fabric choices.

Have a great weekend friends.

Thursday 22 July 2010

Totally Tutorials

Dotty from the awesome Totally Tutorials blog featured my Stuffy tutorial today on her blog. Thanks so much Dotty!

Totally tutorials tips tricks recipes how tos

Check out the Totally tutorials blog for some truly awesome tutes and be inspired!

A big hello and welcome to you if you’ve found my blog via Dotty’s link.

My creative space

Involves wool this week.


Back in May, I shared my plan with you for making 24 woolly hats for the Operation Christmas shoebox project here.

I also told you about my colleague who introduced the project to me. Sadly, she passed away a few weeks ago. At her funeral, her parents requested that my colleagues and I continue making things for the project in her memory. I intend to do just that.

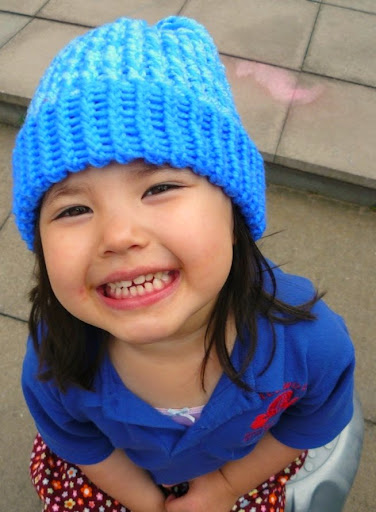
My total number of hats has not grown greatly since May. I did however finish two new hats this week. Here they are being modelled by Dinoboy and Missy Moo.


Go visit Kootoyou’s blog and find out what others are up to today.

Have a creative day friends.

Wednesday 21 July 2010

Give us this day our daily bag

This is the bag I use every day for work.


It was made using the City Bag pattern from Nicole Mallaleiu. I love it. It's roomy and has 2 large slip pockets on the inside too for all my little bits. I made it using the last bit of my favourite out-of-print quilting cotton fabric. As I did not have enough of the quilting cotton to make a whole bag from, I paired this yummy fabric with some decorator weight linen.


I used a little bit of black piping trim on the edge of the quilting cotton to give it a little definition. I had also wanted to use this lovely adjustable black leather handle with it and needed a smidgeon of black elsewhere in the bag to tie it together.


The top is closed with a black zipper and the bag is lined with a black floral print cotton fabric. This bag makes me happy. It faithfully holds all my essential daily stuff and does it with style.

Have a great day friends.

Sunday 18 July 2010

The third of three

Here's the last of the three teacher appreciation gifts I am making for Dinoboy's 3 teachers this year. Dinoboy wrote out three thank you cards this evening. School doesn't finish for this academic year until Friday but he is very keen to take these in for his three teachers.

Here is the tote opened up - this is a very blue tote. I sure hope his teacher likes blue!


And here is the base .....


Finally, this is the tote all zipped up and ready to be wrapped.


These totes are fun to make and I'm really enjoying putting bits of fabric together to see what combinations I can come up with for more zipaway totes. I've just cut the fabric for two more of these totes - will show you in a future post.

Saturday 17 July 2010

One Pretty Thing ...

... is a website which brings you daily inspiration from projects compiled from all over the internet. Rachel is One Pretty Thing's creator and she scours the internet to find the best projects and tutorials on all sorts of things.

My dinky zipaway tote tutorial got featured in One Pretty Thing's Friday's Daily DIY. Thanks Rachel!

oneprettything

If you get a chance, head on over to One Pretty Thing and check out the thousands of links to projects all over the internet Rachel's got on her website.

Friday 16 July 2010

Two down one to go

Yay!! It's Friday!

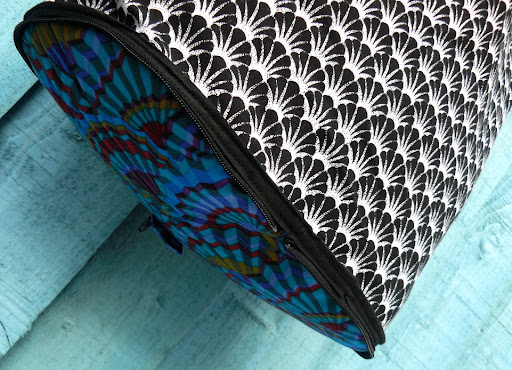
Here is the second of the three zipaway totes I am making for Dinoboy's teachers this year. I can't remember where the black and white print came from but the blue fan print is a Kaffe Fasset print called Paper Fans. My local quilting shop has it in a red colourway and I love it a lot!!


Isn't that black and white print lovely?


Here's the base.


I'm hoping to finish making the last tote at the weekend ... between loads of laundry, cooking and hoovering! I'm also hoping the weather here will be better at the weekend ... we've had 4 days of gloomy, wet and cold weather this week.

So what are your plans for the weekend? Whatever they are, I hope you have a great weekend friends!

Thursday 15 July 2010

My creative space

I'm on number 2 of 3 zipaway totes I am making for Dinoboy's teachers at school. Here's the fabric combination I picked.


See that tab at the end of my zip? It was made from a 2 inch x 2.5 inch bit of fabric but once I sewed the sides up, I ended up with this teeny weeny little 1 inch something square pocket which took me absolutely ages to turn right side out! I just figured out a neat little trick for turning it right side out - use a pair of tweezers! Stick your tweezers into the pocket, grab the top edge of the pocket and gently pull the right side out. Tease out the corners with the tips of your tweezers - you can also use your tweezer ends to gently poke out the corners from the inside of the pocket. It took me less than a minute to do it this way.

Head over to Kootoyoo and see what other bloggers are up to today.

Have a creative day, friends.

Sunday 11 July 2010

One down, two to go

Dinoboy and I had the following conversation early last week ...

Dinoboy: Mummy, are you going to make my teachers some presents for the end of term?
Me: Teachers? I thought you only had one teacher - Miss L.
Dinoboy: Oh yeah - well she's the main teacher for my class but there are two others.
Me: Really?
Dinoboy: Yes. There is Miss T who teaches us Maths and there's Miss C who takes us for Languages.
Me: So what does Miss L do then?
Dinoboy: She takes us for Literacy of course. And she really likes purple.
Me: Okayyyy - so you want me to make presents for all of them?
Dinoboy: Well, it's only fair, isn't it? Maybe you can make them a bag or a purse each. But don't forget, Miss L REALLY likes purple.

I decided to go with zipaway totes this year as teacher appreciation gifts. Here is Miss L's reusable shopping tote.


I paired Alexander Henry's Yui Kokeshi in black with this purple and white dotted cotton.


I love how cute this looks when it's zipped away.


One down, two more to go. I best get a move on as the school year ends the week after next.

Thursday 8 July 2010

The dinky zip-away tote tutorial - Part 3

We're on the home straight now. This is part 3 where I show you how to attach the base to the tote body.

You can find Part 1 here and Part 2 here.

Get the PDF pattern for the base here.

Putting it together


Make sure your tote body is turned right side out. At the bottom end of the tote body, locate the middle point for each side and make a small mark like this.


Match the small marks to the middle marks on your base piece. In the next photo you can see the little blue mark in the gap between the zip ends. You’ll need to carefully pin the tote body to the base. I then basted the tote body to the base. You can see my red basting stitches in the photo below. You don't have to baste - you can go right ahead and sew it on. I have a thing about basting! Haha!


You’ll need to put your zipper foot back onto your machine now for the final steps. Using a 1/4 inch seam allowance, sew a row of stitching to secure the base to your tote body. I find it easier to sew this step with the base facing up.


The final part of this process is sewing the bias binding on. I tend to sew my bias binding on without pinning it first. I learnt how to sew bias binding using this terrific video tutorial made by Angry Chicken aka Amy Karol. After I saw this video, I fell in love with bias binding so much that for a couple of weeks, I bias-bound every edge I could in all my sewing projects! Haha! So go check out that video first if you haven’t seen it before. Then come back here for the end of my tutorial.

You’re back? Cool! OK, the bias-binding is the last bit of sewing on this project. This time we’re going to sew with the tote body side up. Open up your bias tape and fold down the end by about 1/4 inch. Place it along the edge of your base. Start sewing at your fold.


Sew all around the base, working slowly as you sew around the curved part of the base. When you get to your starting fold, lay your bias tape over the fold and sew over it by about 1/2 inch. Cut the rest of your bias tape off.


Turn the base over so the bottom of the bag is facing up again. Fold your bias tape over the edge. You’ll find that your bias tape when folded over to where your zip is, will cover the zip tape up nicely by roughly 1/4 inch. Sew your bias tape down, folding it over as you sew all around. Your tote is finished! Yay!! See how lovely the bottom of the tote looks with the bias tape edge?


To fold your tote up, stick your handles inside the tote body and roll the tote body up like this so it sits flat onto the base.


Fold the base in half and zip it up, tucking the bag inside as you’re zipping it up.


Here you have it – a tidy clamshell-like pouch. Isn’t it cute? Stick one in your car, another in your handbag and you’ll have an eco-friendly tote you can use when you’re nipping out to the shops for a few bits like the Sunday papers and a carton of milk or a loaf of bread.


I hope you liked this tutorial. Do get in touch if you need clarification on any part of the process. I've started a Flickr group here for my tutorials. If you make a zipaway tote or maybe a Stuffy zipper pouch, please post photos of your creations in the Flickr group. I'd love to see them.

The dinky zip-away tote tutorial - Part 2

Welcome back! Thanks for joining me in Part 2.

Making the body of the tote

OK, the body of the tote is next. Take the 12.5 inch x 28 inch rectangle and fold it in half, wrong sides facing so the two shorter ends meet. We now want to create a French seam.


Pin and sew using a 3/8th seam allowance. Then trim your seam allowance down to about 1/8th. Turn the body of the tote inside out so that the right sides are together. Fold the fabric on the seam and iron it down. Stitch another seam at 1/4 inch. Iron the seam so that the flap you’ve created sits flat. Then finally stitch the edge of the flap down.

There is a great tutorial here which illustrates this perfectly.

After making your French seam, turn the body of the tote right sides out. Along one of the top edges, mark the middle point of the piece. Then make a mark 3 inches to the left and another one 3 inches to the right of your middle point. Do the same for the other side. Set the body aside for now whilst you prepare the handles.


Making the handles


If you are using twill or webbing, you can skip this bit. If on the other hand you are making fabric handles from plain cotton, you’ll need to read this bit. Take your 4 inch x 21 inch rectangles of plain fabric and fold them in half lengthways and press. Open it up and press each side in half lengthways again.


Then fold it up so you get a folded strip which is an inch wide and 21 inches long. Kind of like a long piece of folded bias tape. Stitch down each long side of each strip. Voila – handles!


Take one of your handles and pin each end to the little marks you made along the top edge of your tote body 3 inches to either side of the mark in the middle of your piece on one side. Do the same for the other handle on the other side of the tote body. You want to baste the handles to the tote body as close to the top edge as you can. Here's a sketch of what I mean.


Now take the facing strip (in photo below), put the short ends together right sides facing and sew using a 5/8th seam allowance. You’ll now have a loop of fabric. Press the seam open.


Place the facing over the outside of your tote body, right sides together. Line the top edge of your facing with the top edge of your tote body. Pin the facing to the tote body. You'll see that your handles are now sandwiched between the facing and the tote body. Stitch using a 1/2 inch seam allowance all the way around. Backstitch a couple of times when you get to each handle end to strengthen that point. When you’re done sewing the facing to your tote body, pull the facing up and press the raw edge of the facing under by 1/2 inch. It should look something like this.


Now fold the facing over onto the wrong side of your tote body and press the top edge of the bag.


I did one row of stitching just inside the edge of the facing. This secures the facing down and neatly hides the ends of your handles. I then top-stitched a couple of rows along the top edge of the tote. This will further strengthen the handle points.


OK - this is the end of Part 2. In the next part, I'll show you how to attach the body of the tote to the oblong base. Thanks for sticking with me on this one. See you soon for Part 3.

Get the PDF pattern for the base here.