Thursday, 30 June 2011

More summer sewing

I'm still sewing stuff for myself. I have another two slightly modified Pendrells to do soon. Here are the most recent additions to the working wardrobe.

The first is a Sorbetto tank in a lovely chintzy print.


I decided to go for a bold contrast with the black bias binding and etched buttons.


I bought about 2 metres of a black non-crease polyester fabric from the local fabric warehouse. It was a cheapy buy at £3 a metre. I managed to cut 2 skirts from the piece I got. This is the first of the two skirts. This is a simple one seam, elasticated waist skirt. Nothing fancy - just a simple plain skirt.


I'm trying to figure out how to insert an invisible zip for the second skirt. Have to go do some online research now.

Hope your week is going well, friends.

Monday, 27 June 2011

Pendrell number 2

I made the Pendrell again. This time from a soft drapey crepe-like polyester which was in the bargain pallet at a local fabric warehouse. I bought 1.5 metres and it cost me just under £3 because the fabric was priced at around £1.50 per metre.

It's very red, isn't it? The hem isn't crooked ... it was just a bit windy yesterday afternoon when I was trying to take photos of it!


I made it short again like the first version. It rides just on my hipline. It's a good length for me. I made the cap sleeves a bit smaller than version 1. I think in my next version of the Pendrell, I might do away with the cap sleeves altogether and just keep the shoulder frill which I really like.


The weekend was a bit of a sewing fest for me. I finished this top, another Sorbetto tank top and a simple one-seam elasticated waist skirt for me. I'll show you the other two items later.

Today is a big-ish day for Missy Moo. We have a 1-hour visit to her new class which she will join formally in September. Today's a bit of a mini induction I guess. She's wearing her new uniform (this is the summer dress) and is very excited.


Dinoboy is in the Junior school linked to the Infant school Missy Moo will be joining. They will walk to school together but once the school day starts, they won't really see each other until after school when they will both be at the after-school club together. They are both quite looking forward to September.


Have a great day, friends.

Sunday, 26 June 2011

Where I hone my powers of resistance to temptation ...

... and fail miserably probably 6 times out of 10!

I've lived in our home for 14 years now and I regularly have to drive past a wonderful shop called the Cotton Patch. I don't always drive past it ... sometimes I walk past it. And every single time I do, I have to say to myself "No, you don't need anything from there - move along please!"

It's quite hard for me to move along when the inside of the shop looks like this -


Or this - look at those rolls of oilcloth.


There's a shelving unit full of Amy Butler fabrics.


There are baskets of neatly folded fat quarters.


There's a wall full of books and magazines.


Right next to that is the Moda rack with tempting layer cakes and jelly rolls.


Every nook and crannie is filled with fabric, nifty gadgets and all manner of quilting goodies.


In my house there are boxes full of fat quarters, half yards and the odd full yard. I am slowly working my way through my stash ... very slowly. I don't really need any more fabric - yet sometimes when I have a day off work, I am drawn to this lovely place. The staff there are great and don't mind if I wander in for a chit-chat, see what's newly arrived and spend a few moments touching the bales of gorgeous fabric lovingly and staring at the shelves in awe. Sometimes I go in and manage to leave without making a purchase - not very often mind. More often than not, I cave in and walk away with a little bundle of fabric clutched to my chest possesively.

The Borg were right. Resistance is futile.

Wednesday, 22 June 2011

Gathered pouches

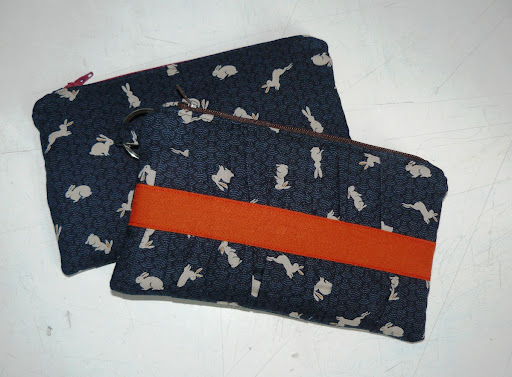
A while ago I made a couple of gathered zippered pouches using Noodlehead's pattern here. At the weekend, I decided to make a couple more. They are lots of fun to make. The construction is easy and the gathering and band on the one side makes it a bit more interesting than a plain zippered pouch.


I adore this bunny fabric. It's so cute. I have a lovely pouch which my longtime friend & fellow blogger Fiona made for me in the red version of this bunny fabric. So when I saw a fat quarter of the blue bunny fabric in my local fabric shop I bought it immediately. Too cute to pass up.

One of these pouches has a new home with a good friend of mine whose birthday it was last week. I shall keep the other for myself. There's enough fabric left over to either use in a bag or to make another largish pouch or a couple of smaller pouches. I like the fact that fat quarters can go a long way.

It's hump day today. I hope your week has gone well so far. Not long until the weekend. Enjoy the rest of the week, friends.

Saturday, 18 June 2011

The Pendrell top - First attempt

Not that long ago, I came across Tasia's (aka Sewaholic) blog and saw her Pendrell blouse pattern and her sewalong. Since then, I've seen loads of Pendrell tops all over blogosphere. So this is the Pendrell ...


I really like view B with the frills. So I decided to get the pattern and make one. Here's my first attempt at the Pendrell.


I have a habit of picking busy prints like this one. It's hard to see the frills and the princess seam detail in the photo with all that funky print action going on. You can see the shoulder frill a bit better in this next photo.


I traced the pattern out onto tracing paper and realised that the original pattern was pretty long. I lowered the neckline a little and hacked 3 inches off the pattern length. I think the shorter length works better for me. This is a nice polyester microfibre fabric. Wonderfully light and soft with great draping quality but the handle is a little more substantial than a crepe de chine.

I like the princess seams a lot and the pattern was pretty easy to follow. I intend to make another one soon.

Hope you're having a great weekend, friends.

Thursday, 16 June 2011

My creative space

I just finished my first attempt at the Pendrell blouse. I'll take pics and do a post on it soon. The space is presently being taken over by strips of dotty fleece.


Summertime is a good time to pick up cheap fleece throws or blankets. The house furnishings warehouse near me always does sale offers on fleece blankets in the summer. The fleece blankets are great for making kids scarves. I trimmed the finished edges of the blanket, then cut it widthways into 6 inch strips. Each scarve has fringed ends. The fleece doesn't fray so there is no need to edge-finish the long sides. I got 12 scarves out of a single blanket. These will be put aside until later on in the year when I start making up gift-boxes for the Operation Christmas Shoebox charity project.

Find out what other folk are up to in their creative spaces here.

Have a creative day, friends.

Sunday, 12 June 2011

Weekend sewing

The weather this weekend was not brilliant - although Saturday morning was by far the best as the sun was in the skies long enough for my laundry to line-dry. I had my washing out on the line by 8 am and when the clouds rolled in later on after lunch, everything was pretty much dry. Then it started to rain. It rained most of today (Sunday) too.

The kids managed to find things to amuse themselves with (which in Missy Moo's case, involved harassing and annoying Dinoboy a lot! Poor lad!) and I managed to get a few sewing projects done.

I made 3 quillows - here's one of them.


I love the duck-egg spotty blue fleece. I managed to get 3 of these in a local warehouse sale. Two have ended up as quillows and one will be cut into 12 kids scarves for the Operation Christmas Shoebox project later on this year. Here are the other two quillows I made this weekend.


I wanted to have a go at the Sorbetto tank top which is a freebie pattern from Colette Patterns. I wanted to make a muslin first just to make sure the pattern was OK and didn't need tweaking. I found a piece of Malaysian batik in my stash basket. It was not a very large piece of fabric but there was enough to make the muslin of the Sorbetto. It's a pure cotton fabric and I think about the same weight as quilting cotton.


This was a pretty quick top to make. The fit is OK. I made it a bit longer than the original pattern. The batik print is rather busy so the box pleat on the front is a little lost. I might see if I can find a lighter weight fabric - maybe a cotton/silk blend - to make this again.

My next sewing project will be the Pendrell blouse by Sewaholic. I have the perfect polyester microfibre print for it. I'm a bit apprehensive about it as it looks a bit complicated (I've not done princess seams before) but the instructions look reasonably straightforward. I'll let you know how I get on.

Have a great week ahead, friends.

Saturday, 11 June 2011

Boxed sunshine

In early summer here in the UK, the Asian food shops near the area where I live start to display a whole load of slim cardboard boxes in stacks. The boxes are full of honey mangoes or Chausa mangoes from Pakistan.


The season is short - only about 4 to 6 weeks at the very most. It's one of the highlights of my summer and I have a tendency to become very mango-centric! It made me laugh when I popped into a local shop to get my first box of the season just over a week ago (having spotted them on my way home, screamed like a banshee in the car and then hurriedly pulled over at the first opportunity to run back to the shop) and the shopkeeper (an elderly gentleman) laughed and said "I was thinking when you were coming. Mangoes come, you come!"


I have been known to dash into a shop and exit with 4 to 6 boxes of mangoes for friends and colleagues! Mango madness. I love these tasty gems packed with vitamins and minerals – vitamin A and E as well as iron and selenium. I heard somewhere that a medium-sized mango has about 100 calories. Not too bad I guess. They have an amazing flavour and make me think of sunshine when I'm eating them.

I'm heading out to the shops shortly to get a few boxes for friends at work ... and maybe pick an extra one up for myself!

Have a great weekend, friends.

Tuesday, 7 June 2011

Hottie finished

I finished my hottie cover for the Hottie Challenge over at Curlypop's blog last night.

Here's the front ...


And here is the back which is the same as the front.


The leaves and stems were cut from a lovely soft flannel scrap.


The top had to be kept open so the cardboard cutout could be inserted. This was the only rule in the challenge. There's a sew-in popper underneath the sun to secure the top opening.

I'll be posting this off tomorrow morning and I hope it gets there in time for the deadline. Have a look at the Flickr group here to see the other entries. Hottie number 3 which can be seen here is my favourite so far.

Hope you're having a good week, friends.

Saturday, 4 June 2011

Rookies and a cool design concept

I can't even remember how young I was when I first started to use chopsticks. I do remember I started out gripping both sticks tightly together and not using them very effectively until I was maybe about twelve when I finally got the concept of holding the sticks apart.

For Missy Moo's birthday, a friend gave my two kids these rookie chopsticks and they are seriously clever! Missy Moo got a pink rabbit one like this -


and Dinoboy got this super cute Penguin one.


Look at this for perfect placement of fingers! Missy Moo found it quite natural to curl her ring finger and pinky in to support the one side of the rookie stick.


Dinoboy was still finding it slightly awkward and wasn't sure how his ring finger and pinky should sit but he'll get there eventually.


Dinoboy was even picking peas up with his new rookie sticks!


I didn't give the kids any instructions - I just passed them the rookie sticks along with the packaging it came with and let them look at the sticks for a while and get a feel for them. Within a minute, they had figured out how to hold them. The design is simple and intuitive. The size of the silicon finger rings clearly indicate which fingers go where and the kids were able to figure it out for themselves without much intervention from me. Fun and cool!

Have a great weekend, friends.

Thursday, 2 June 2011

Fancy some granola? I do!

Inspired by a friend’s comment that she had made some homemade granola, I had a go at making my own. At the end of my granola-making session, I had two questions:
1) Where have I been all this time that I didn’t know about granola?? (You’re probably thinking that too aren’t you?!)
2) How can something this easy be so darn yummy and why do they charge so much for those fancy boxes of granola in the supermarket?
Sorry – that was really 3 questions.

I have a confession … as much as I love fresh grapes, cranberry juice and cherries; I seriously don’t like the dehydrated versions. So I am therefore not a big fan - actually not a fan at all – of raisins, currants, sultanas, dried cherries or craisins / dried cranberries. Some of you will probably think I am bonkers for disliking dried fruit – but that’s just me, I’m afraid. I’ll always remember that quote in the movie Benny and Joon where there is a discussion about raisins and Joon says “They used to be fat and juicy and now they're twisted. They had their lives stolen. Well, they taste sweet, but really they're just humiliated grapes. I can't say I am a big supporter of the raisin council.” I couldn’t agree more, Joon. Anyhoo – I digress. Sorry.

I like muesli … but the boxes of muesli from the shops pretty much always come with dried fruit in them (especially raisins and sultanas) and the thought of picking all the dried fruit out of my breakfast cereal every morning drains my will to live. It also does not seem like a productive use of my precious time. Not to mention a waste of dried fruit. So consequently, I don’t buy muesli. I never ever bought granola either which I used to think was some kind of posh other word for muesli – after all it sort of looked the same in the boxes.

When I did some online research about making granola, I realised that you could pretty much put in or leave out as much or as little as you liked. So after browsing a ton of recipes and having some idea of what went into making granola in my head, I went to the local health food shop and bought a bag of jumbo rolled oats and a variety of nuts and seed. I pretty much had everything else I needed in my kitchen cupboard.

Here’s what I ended up with and it is totally yum! Now its summer and soft fruits are starting to appear en masse in the local shops, a handful of fresh fruit turns breakfast into something healthy and delicious! No humiliated fruits in sight either. Yay!!


The recipe I used is an amalgamation of a variety of recipes found online.

3 cups of jumbo rolled oats
A third of a cup of almond slivers
Half a cup of desiccated coconut
1 generous cup of chopped nuts of your choice (I used a mix of chopped pecans, brazil nuts and hazelnuts. I bought plain, unsalted nuts from the health food shop)
A third of a cup of seeds of your choice (I used pumpkin seeds.)
Half a cup of banana chips broken into smaller pieces
A generous tablespoonful of flaxseed or wheatgerm (I used flaxseed)
Half a teaspoon of ground cinnamon
A teaspoon of vanilla essence
2 tablespoons of sunflower oil (I guess you could use canola or vegetable oil – some recipes don’t have oil at all but use a lot of applesauce instead)
Half a cup of maple syrup
A third of a cup of unsweetened applesauce (I had a jar of plain store-bought applesauce in my fridge so I used that instead of making my own but I think in the autumn when I can get some windfall apples from neighbours and friends, I might make my own.)

Preheat the oven to roughly 165°C or 325ºF.
Line a large baking tray with greaseproof paper.

In a large bowl, mix up the oats, flaxseed, chopped nuts, desiccated coconut, almonds and ground cinnamon. In a smaller bowl, mix the oil, vanilla essence, maple syrup and applesauce together. Pour the contents of the smaller bowl into your large bowl of dry stuff and mix it thoroughly until there are no dry bits. Tip the mixture out into your baking tray and spread it out.

Pop it into the oven and bake it for 10 minutes, then take it out and gently stir it about to bring the stuff at the bottom of the tray to the top. Pop it back into the oven again for another 10 minutes, then bring it out and stir it about again. I then pour in the pumpkin seeds and banana chips and stir them into the mix. You basically want to bake it until the mixture in your tray is a gorgeous golden brown, stirring occasionally so the mixture browns evenly. This normally takes about 30 minutes or so. Apparently the browner the granola gets (without burning) the crunchier the granola will be.

If you’re adding dried fruits, apparently you should add it after your granola has been baked and is cool. You can also add chocolate chips if you want to the mixture once it has cooled down. The result is a lovely crisp textured cereal with just the right amount of sweetness for me. If you prefer it sweeter, I guess you could add some soft brown sugar to the mixture when you’re mixing it in your bowl at the beginning. This is fabulous eaten with cold milk and a scattering of fresh fruits.

Do you like granola? How do you eat yours? Do you make your own?

Wednesday, 1 June 2011

My creative space

I'm still working on my hottie cover for the Curlypops Hottie Challenge in aid of the Margaret Pratt Foundation Heart Lung Transplant Trust.

I've completed one side of my hottie cover and am rather pleased with it.


It's quilted and has applique flowers on it with yoyo and button centers. I've not done much applique before ... or yoyos for that matter.


It's a fun little project to have in my space right now. I'm hoping to get it finished soon and sent off to Australia in time to meet the deadline.

To find out what's happening in other creative spaces around the world, visit the home of creative spaces.

Have a creative day, friends.