**UPDATE NOTE: You can now download this tutorial as a PDF.
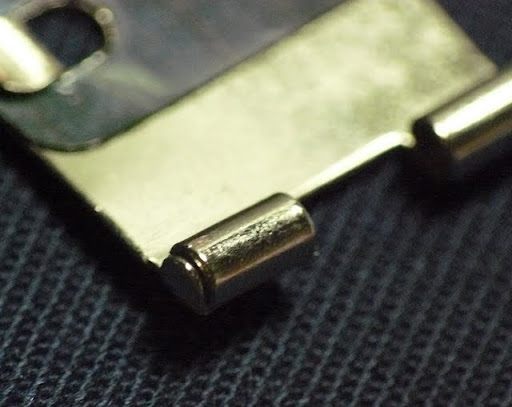
This is an internal flex frame. I'm using a 3.5 inch wide one. You can get them from quite a few online shops. Here's two I know of: UHandbag does them and you can also get them in packs of 10 from these guys who are in Hong Kong. I got mine from them and they were very prompt in their email correspondence and posting. So back to the flex frame. There's a little metal pin that comes with it (unfortunately not in the photo below) - do keep it somewhere safe as it is absolutely tiny and you'll not be able to finish your glasses case without it. It's the pin that holds the frame together.

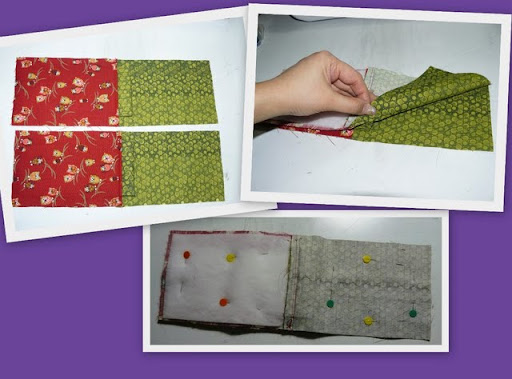
The pattern itself is very simple. Measure out two rectangles on a piece of paper. One rectangle should measure 4.5 inches by 7 inches. This is your body piece. The other one should measure 4 inches by 2.5 inches. This is your sleeve piece. Cut the rectangles out and you've got your pattern pieces. By the way, I've used quilting cotton fabric for my glasses cases.
Using the larger rectangle pattern piece, cut out 4 pieces of fabric (two for the outer and two for the lining) and 2 pieces of fusible fleece. I use Vilene Medium Loft H640 single-sided fusible fleece. I believe Peltex do a fusible fleece too. I cut the fleece slightly smaller than the fabric pieces. Fuse your fleece to the two pieces of outer fabric by placing the side with the glue dots down on the wrong side of your fabric pieces, then iron using an ironing cloth.

Use the smaller rectangle and cut out 4 pieces of fabric and two pieces of fusible fleece. These will form the sleeves for the flex frame. You can decide if you want your frame sleeves to be the same fabric as your outer (in which case you cut 2 from the outer fabric and 2 from the lining fabric) otherwise you can cut 4 pieces from the same fabric. Fuse the fleece to the wrong sides of two of your pieces. You'll end up with something like this ...

Place one of the sleeve pieces with the fleece on the back together with one of the non-fleece pieces. Put them right sides together and sew a seam down each of the narrower sides using a 3/8th inch seam allowance. You get something like this.

Turn the sleeve right side out (see photo on the left below). Iron it flat and top-stitch down each narrow side about 1/8th of an inch in from the edge (see photo on the right below).
Now fold the sleeve in half lengthways (see top left photo below) and pin it. Then baste the two edges together (see bottom right photo below) and you'll have one sleeve done. Do the same for the other two smaller rectangles and make up the second sleeve in the same way.
Take one of the sleeves and one of your body pieces - one of the outer fabric ones with the fleece fused to the reverse. Find the middle point on one of the narrow sides of the larger rectangle. Mark it. Then fold the sleeve in half lengthways along the raw edge and find the middle point. Mark that too. Match up the marks so that the raw edge of your sleeve is sitting on top of the narrow edge of your fabric rectangle. (Your fabric should be right side up.) Pin it in place. See the photo on the left below. Baste your sleeve to the body piece by sewing a line of stitching 1/4 inch from the edge. See the photo on the right below.

Now take one of your body lining pieces and place it right sides together onto the outer body piece. (see photo on the left below) Align the top edges and corners. Pin and sew across the top (where the sleeve is) using a 3/8th inch seam allowance. See photo on the right below.
You now have one side of your glasses case complete. You should have something that looks like the top left photo below. (At this point if you wish, you might want to slide one of the arms of your flex frame into the sleeve to check for fit. It should slide all the way through to the end of the sleeve.) Give the piece a quick press and top-stitch close to the top edge where the outer fabric of the body joins the sleeve. See the photo in the bottom left below. Make the other side of your glasses case with the remaining sleeve, and body pieces. You should end up with two sides as shown in the photo on the right below.

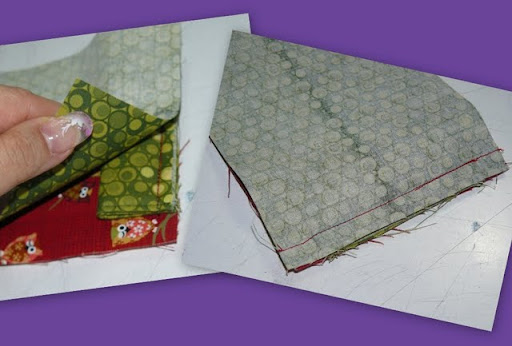
Open up the two sides and lay them flat. Place one side on top of the other, right sides together. Then being careful to match the corners and edges, pin the two pieces together. See below.
What you need to do next is to sew all around the long rectangle, making sure to leave a 2 inch gap along one of the sides in the lining section. I've marked out my stitching line in blue as you can see in the photo below to show you where I would sew. I'm using a 3/8th inch seam allowance. See the gap? This gap is really important otherwise we won't be able to turn the case right side out when we're done.

Sorry about the slight blurriness of this next photo. I wanted to show you the spot where the outer meets the lining. This is also the corner which is pretty difficult to sew because of the sleeves under the top layer. If you use a regular foot, you might find the bulk of the sleeves get in the way when you're trying to sew down this side. This corner and the corresponding one on the opposite side are a real pain to pin too. I have used my basting gun to put little tacks in to hold the pieces together. But you can use a needle and thread and quickly sew a few holding stitches about 3/8th inch in to hold the two sides together.

I have this foot which came with my machine (see below). I think it is a piping / zipper foot. As you can see, there is nothing of the foot-bed going past the needle along the side. This foot lets me sew real close to the edge of the sleeves on the sides. You can try to see if you can use your zipper foot if you find it a bit challenging sewing the two sides by the sleeves.

OK. I've now sewn all around my rectangle. Here is how it looks.

Next thing to do is to clip the corners off carefully - don't cut through your stitching lines! I also trimmed off a bit of the excess fabric on the edges.

Do the same for the outer part of your body too.

Put your fingers into the gap you left in the lining and gently pull the outer part of the body into the lining part. See the photo to the left below. Then gently pull the outer body out through the gap. See the photo on the right below.

Once you have turned the whole case right side out, use a pointy thing like a pen or in my case, my bonefolder, and gently poke the corners out neatly.

Sew the gap in the lining closed. See photo below. Then tuck the lining into the body of the case, again using your pointy thing to make sure the corners are poked in properly. Give the case a bit of a press with your iron. Almost done - we just need to insert the flex frame.

The open hinge end of your flex frame looks something like this. See the two little metal flaps or caps?

Using a pair of pliers, gently close one of the flaps so it looks like this ...
Then, slide your frame into the sleeves. Each arm of your frame goes into it's own sleeve.
When you get the frame into the sleeves, push the sleeves further in to give you a bit of space to work on closing the frame up. Line the hinge at the end of the frame up together. Remember the teeny little pin / bar that came with your frame? You did put it somewhere safe, didn't you? Get it and insert it into the hinge tubes. Push the pin all the way in and then using your pliers, close the little metal cap over the pin so the pin is trapped inside the hinge. Push your frame back into the sleeves and smooth it all out nicely.

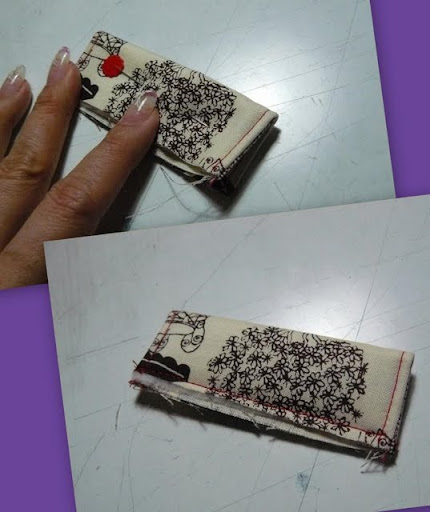
Give it a few squeezes to open and close it ...

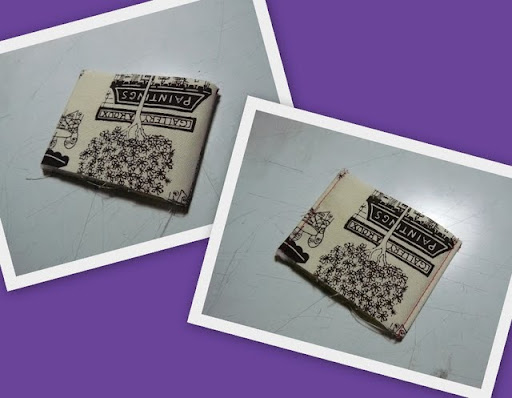
You're done! You now have this lovely glasses case with it's tidy flex frame opening.

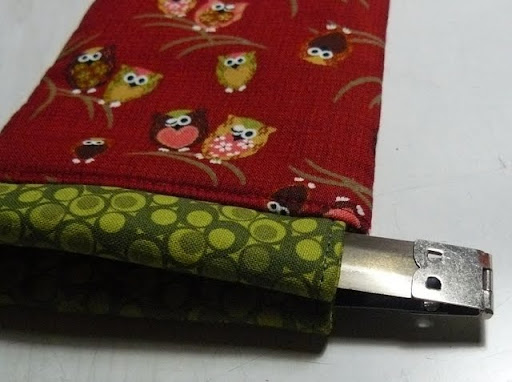
You can use the same flex frame and the same sewing process described in this tutorial to make a gadget / phone case. I made one for my Samsung touch phone. My friend's iphone fits into this case too. Just make the body pieces one inch shorter. So your body pieces for a gadget pouch will be 6 inches x 4.5 inches. I put a little loop of fabric in mine (I sandwiched it between the sleeve and the body piece when I was sewing the sleeves on) and a split ring through the loop. I can then hang this pouch off my lanyard if I want or hook it onto the snap-hook in my handbag.

I hope you have found this tutorial helpful. Sorry it's a bit long - I tried to use collages of progress photos so it's not quite so long. Let me know how you get on and if you can, post your glasses cases you've made using this tutorial on my Flickr page.
Happy sewing, friends!
(PS. If you spot a typo, let me know so I can correct it! Thanks!)
Great tutorial Ady. I'll surely make some more now using your method - the results are far tidier than the gadget pouch that I made!
ReplyDeleteGreat tute except for one problem. I had to copy and download as a pdf in order to read it. Your blog background is very pretty but makes for hard reading. Can't even read to see what else you have here to say by using the left side blog roll. Just thought a newcommer might let you know. Thanks for the tute!
ReplyDeleteOMG, I posted the comment and after it posted it came up with a gray background. That is so wierd. The backgroud was all orange and green like the sides of the gray. Never had that happen befor. So this way is all so easy to read. Hmmm, wonder what caused it?
ReplyDeleteThanks Fiona. Let me know how you get on.
ReplyDeleteHi DonnaRae. I take your point with the tute being hard to read on screen ... I think I might try to provide them as PDF downloads for folks to save to their PCs to review later. As for the screen colours ... hmmm, gremlins at work me thinks.
Thanks so much! I really appreciate you posting this. I'm a bit scared, but I usually am when I read tutorials through. I might not get a chance to try this for a couple of weeks but I'll make sure to let you know when I do...
ReplyDeleteA note on the comment about your background - sometimes when I load people's blogs they have a wierd coloured background, but then it disappears and it's just the sidebars that are that colour. Think it's my computer being slow as it generally only does it on my rubbish laptop at home, not my faster work PC
p.s. - did you know you were featured on Craft Gossip??
ReplyDeleteGreat tutorial! I've often wondered about how to put in a flex frame and your step-by-step made it look easy
ReplyDeleteHi Ady,
ReplyDeleteAs you know, I love this tute, but I'm just in the middle of making another one and I think there is an error. The first sewing bit - where you sew the sleeve ends right sides together, if you do a 3/8 inch seam both sides, the frame sticks out the sides too far - I did one side 3/8 and one side 1/4 and it fits better.
Am I allowed to sell items made from this tute -to family and friends and/or locally and/or on Folksy?
Thank you so much for this tutorial, so kind of you to share, you have done a great job! kind regards, Jenny
ReplyDeleteI love how you've made a separate pocket for the flex frame. Bought a few of those frames at a craft fair years ago but never managed to get them happening. I will now, and use this tutorial! thanks so much
ReplyDeletelore
x
thanks for tutorial.
ReplyDeleteSorry I'm a bit late to the party!! ;) I made the eyeglass case today and it is PERFECT :) Actually it's so perfect that I cut out and kitted 6 more to make for Christmas gifts, lol! I posted a photo on my blog and linked back to you - thank you for the tutorial!
ReplyDeleteWow! This is the best finished flex frame purse I have made so far. Thank you for the detailed tutorial. Photos make all the difference! Can't stop smiling as I flex my pouch open and shut (^_^)
ReplyDeleteThanks for sharing this tutorial. It's very easy to follow, and I'm looking forward to giving it a try.
ReplyDeleteI would like to use the flex frame without having the metal showing at the sides, any ideas?
ReplyDeleteIt probably could be done but might involve making the casing for the flex frame longer and hand-stitch the ends close once you have inserted the frame.
DeleteThank you for your comprehensive tutorial. I made a wonderful case. Is there any chance you could help me further? My mother wants a double sided case and I have no idea where to start. I thought you might know how to do it? Many thanks
ReplyDelete